Este es un artículo que varios me pidieron que hiciera y creo que realmente es un buen constructo para tener en nuestros cultivos. Hemos visto aeroclonadores, bandejas para replicar, hasta incubadoras climatizadas, para hacer clonación de esquejes. Pero hoy vamos a ver como haríamos si quisiéramos no gastar dinero y tener pequeños ambientes de clonación que entren distribuidos en nuestro indoor.
Pero comencemos por el principio, qué necesitan nuestros cortes para poder sacar raíces:
- Humedad
- Luz
- Un sustrato o medio
- Agua declorada
- Una temperatura de entre 20 y 25°C
- Un enraizante, ya sea comprado o hecho por nosotros-
Veamos que necesitamos para armar nuestro microambiente de clonación (FUAAAAA anotame el término que me encantó)

Materiales:
- Cutter o cuchillo muy afilado.
- Tijera.
- Hueveras de replicación (o vasos de cumpleaños con agujeros en la base).
- Envase transparente.
- Perlita.
- Agua declorada (Cantidad necesaria).
- Agua oxigenada (2 tapitas).
Procedimiento
Ahora lo que vamos a hacer, con cuidado y sin cortarse (de ultima llamen a un menor que haya en la casa ya que es posible que el mismo no haya fumado nada :P) es dividir el envase en dos. La idea es buscar que las partes separadas encastren, así cortamos unos 10cm de la parte central (ya que no necesitamos que sea tan alto y así se conservará mejor la humedad) de nuestro envase. Buscando que la parte de arriba sea cortada en la parte mas ancha (de las pancitas que tiene el material de la botella) del envase y la de abajo en la parte mas fina, de esa manera después encastran.

Recortaremos una huevera de cultivo o pondremos juntos y atados (para que no floten y se caigan) 4 vasos de fiesta (vacíos, las cosas que hay que decir jajaja), perforados en la base.
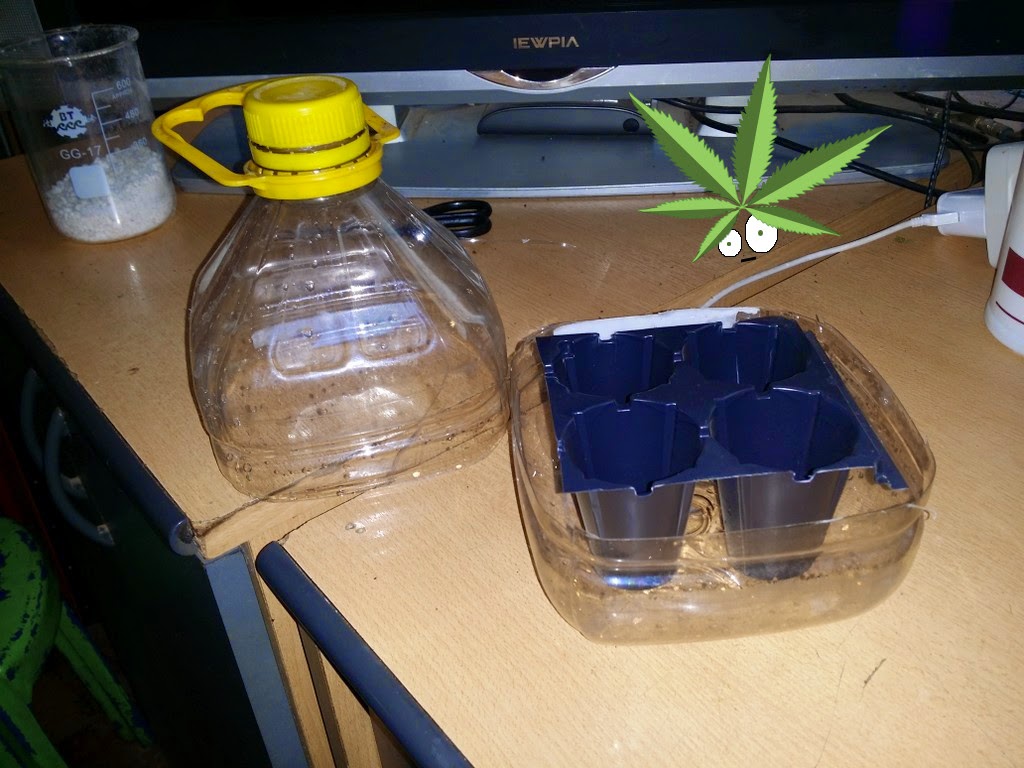
En la parte de abajo colocaremos leca o piedras, para evitar que luego se salga la perlita y mantener la irrigación.

Llenamos las hueveras con perlita y llenamos nuestro clonador hasta cubrir la mitad de las hueveras con agua declorada y le agregamos dos tapas de agua oxigenada, la cual mantendrá a cualquier patógeno alejado de nuestros esquejes.

Ya podemos poner nuestros cortes de planta, con corte a 45°, un leve raspado en la parte baja y sumergidos en un enraizante, como habrán visto en el artículo anterior estoy usando aloe vera.

Lo tapamos, y de 7 a 10 días mas tarde tendremos nuestros esquejes listos y enraizados.

Una vez listos podremos pasarlos a nuestro susrato predilecto!

Espero que les guste y lo usen con tan buenos resultados como yo
Salute y paz
~Ener1
Si te gustaron y sirvieron los consejos dale click a alguna de las publicidades! Gracias!

![]()